Setting up correct routers is important. There are some popular brands in the market, and one of them is Belkin. Setting up a Belkin router means configuring your router to secure your network both at your home and your office. But in order to configure the router one needs to have a proper understanding of its settings. One must be aware that they can reset the settings from the Administration panel. Likewise, one must also take into account changing their passwords from time to time, for security reasons.
So today we are going to help you understand the panel and how to access it using 192.168.2.1. So let us begin with the Belkin Router login guide, to have complete access to the router interface.
The web panel is the Belkin router interface from where you can make all the changes. So for accessing the Belkin router dashboard, and the Belkin router login page here are a few things that you need to know before you move to the main process.
Getting Started with Belkin Router
Default Gateway of Belkin Router: 192.168.2.1
In order to access the Belkin router console, you can make use of the default gateway, i.e., the IP address and the web address. For Belkin routers, you can use 192.168.2.1 as the default Belkin router IP address.
Belkin Router Connection
Connection with the Belkin router is important to access the dashboard. You need to be connected, with wire or wirelessly from the router. After this only you can log in, reset the username or password, update the firmware or restore the router to default factory settings.
How to Login to Belkin Router?
With the help of default settings and login credentials, you can easily login to Belkin router interface. You just need to follow these instructions and you will be able to login to access the Belkin dashboard like a pro.
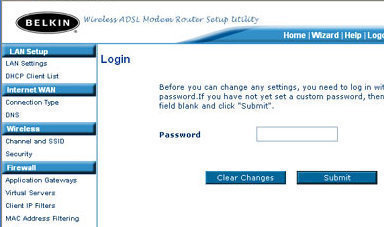
Step 1: Launch your web browser. Then in the web address bar type- http://192.168.2.1 and press enter.
Step 2: Now click on Login. And then press the Submit button.
That’s it. You have successfully logged in. The default login credentials of the most routers are as following and so is of Belkin router.
Default Username- admin, Admin
Password- blank
Yes, remember to keep the password field blank. And just press the Submit option.
How to Connect a Belkin Router?
Sharing the Internet connection at high speed requires the setting up of the router. So there are two methods with which you can set up the Belkin router. The first one is via manual configuration and the second is using the Setup disk that came with your Belkin router.
Method 1- Manual Setup of Belkin Router
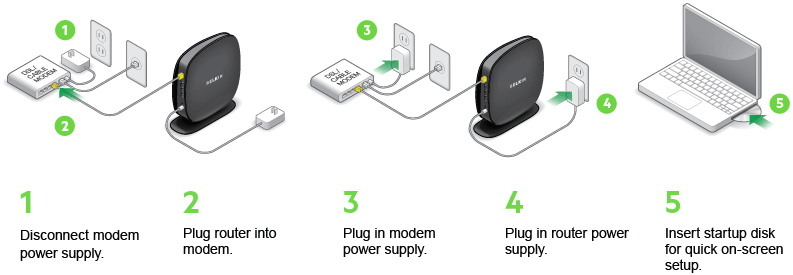
Step 1: To begin with, unplug the power connection of both router and modem.
Step 2: Then use Ethernet cable to connect the modem with your Belkin router. The open Ethernet port on the modem and the WAN/ Internet port on the Belkin router are used for the connection.
Step 3: Now reconnect the modem to the power. And also connect the router to the power supply.
Step 4: Using the Ethernet cable, now connect the router with the computer. This will allow your computer to directly communicate with the router during the entire process.
Step 5: Now launch the browser and browse 192.168.2.1 IP address. As this is the default Belkin router login IP address, the Belkin router login page will be displayed.
Step 6: Enter the username as “admin.” And keep the password field blank. Click on the Submit option.

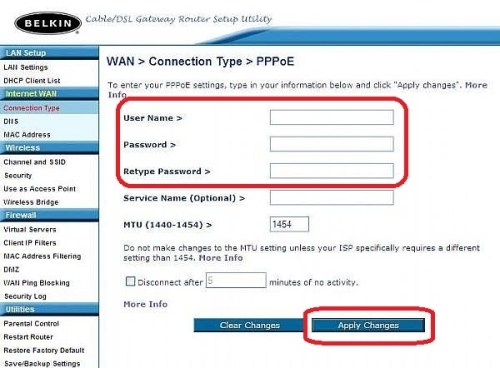
Step 7: You will be logged in to the router page. Now on the left-hand side click on Connection Type and then under the Wan> Internet Connection type, choose Dynamic/ Fixed IP.

Step 8: In case you are not sure about your connection type then you can contact your ISP. Then provide the network details and click on Apply Changes.
Step 9: Your Belkin router will be connected. Check the status under your Internet Connection name.
This was one way by which you can access the Belkin Router login page and set up your device for unlimited internet connection. If you do not have much time, then you can use the disk provided by the company for setting up the router.
Method 2- Setup Belkin Router using the Setup Disk
Step 1: Disconnect your modem and router from the main power supply. Now connect the Belkin router and modem using Ethernet cable.
Step 2: Plug in both router and modem to the power supply.
Step 3: Open the optical disk drive and insert the Belkin Easy Install Wizard Software that came with the router. After about 15 seconds the wizard will come on your computer screen.

Step 4: After clicking on the Run the Easy Install Wizard, just follow the onscreen instructions. The Internet connection will be set up and username and password will be generated.
Step 5: As all the devices of your home and office will be connected, click on the Finish button. The Wizard window will be closed and you will be informed that the router is connected to the Internet.
So after you set up the router, you can also undertake the Belkin router reset process. If you too want to change the password and network name of your Belkin router, then you can go ahead with process given below.
How to Reset Belkin Router Login Password?
For all those bad boys who can propose a danger to your network, you can reset change the password of your router. Follow the instructions given below.
Step 1: After logging in, the page that appears click on System Settings. It is present under the “Utilities” option, on the left-hand side.
Step 2: You will be prompted for the Administrator password. You can set your new password over here.
That’s it. If you wish you can also write down the password somewhere. Click on Save Settings option and you are good to go.
Also Read: How to Fix Belkin Router Not Working Errors
Guys, this was all about how to log in and setup Belkin router. We hope that this article was helpful for you to set up Belkin router. If you have any other questions or are stuck up at any step, then do share it with us in the comment section.
